Wonderware
Application Note
PDF Download
Wonderware’s Server for Modicon Modbus
About this Application Note
This application note is designed to help configure Wonderware’s Server for Modicon Modbus. It
describes how to use Wonderware’s Server for Modicon Modbus to communicate with Allan-Bradley
PLC’s, SLC’s, and MicroLogix devices through Equustek’s DL3500 and DL4500 products.
This Application Note assumes the following :
• Wonderware’s Server for Modicon Modbus has been installed.
• You have an Equustek DL product that communicates using Modbus on one of its channels
and are familiar with using the DL32 configuration software for mapping addresses between
Modicon Modbus and Allan-Bradley’s DF1 / DH+ / DH-485.
• You have installed the DL32 configuration software that comes with your Equustek DL
product.
• You have reasonable knowledge using a PLC, SLC, or other similar devices as well as the
software used for program them.
• You have an Equustek DL product that communicates using Modbus on one of its channels and are familiar with using the DL32 configuration software for mapping addresses between Modicon Modbus and Allan-Bradley’s DF1 / DH+ / DH-485.
• You have installed the DL32 configuration software that comes with your Equustek DL product.
• You have reasonable knowledge using a PLC, SLC, or other similar devices as well as the software used for program them.
1. Setting up your DL product
Before setting up Wonderware’s Modbus Server software, it is important that your DL product
has been properly configured. The following is a quick guide in helping you set up your DL
product as a Modbus Slave. For a more detailed setup, please refer to the Modbus Slave
application note located on your Equustek setup CD. This document can also be found on
Equustek’s website www.Equustek.com. If you have already setup your DL product and have
mapped the addresses you need, please proceed to Section 2, Configuring Wonderware’s Server
for Modicon Modbus.
1.1 Modbus Slave Parameters
The following section will show how to map Modicon’s Modbus registers 40001 to 40010 to
Allan-Bradley’s data file N7:0 to N7:9 in your DL product. The procedure shown is for
communicating with an Allan-Bradley PLC-5 on a DH+ or DH-485 network.
1. Connect your Equustek DL product to the PC that has the DL32 configuration software installed on it using a RS-232 null-modem cable. Refer to your DL products user manual for more information.
2. Open the DL32 configuration software and choose the product that you have purchased. Choose the COM port that is connected to your DL product and click on the Configure/Open File button. Now choose the settings that you want to use for your DL product and then click on Set/Change Modbus Parameters.
Note: Wonderware’s Modbus Server only allows the following BAUD rates: 300, 1200, 2400, 4800, 9600, and 19200.
3. To map Modicon Modbus registers 40001 to 40010 to Allan-Bradley’s data file N7:0 to N7:9, enter the following data as shown in the window below.
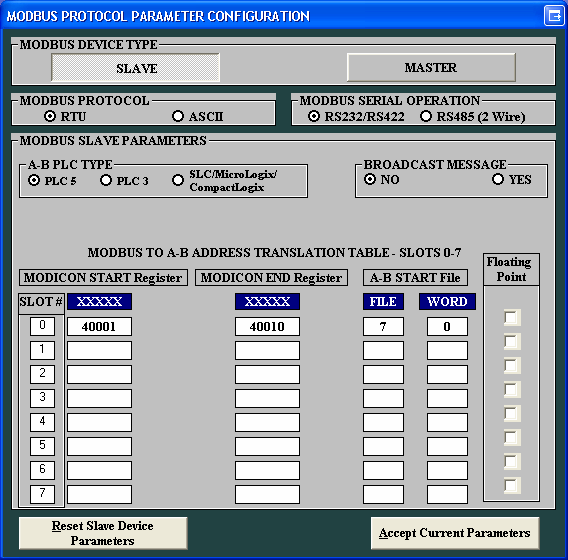
4. After you have entered the following data, click Accept Current Parameters. After you
accept the parameters, the previous window should appear again. Click Downloading
Parameters and follow the instructions. Restart you Equustek DL product and continue on
to the next section.
2. Configuring Wonderware’s Server for Modicon Modbus
The following sections are provided to help configure Wonderware’s Server for Modicon
Modbus for use with your purchased Equustek DL product. The configuration of this software is
very similar to that of Wonderware’s ABKF2 I/O Server.
2.1 Setting up the Modicon Modbus Server
This section is designed to help with configuring the COM Port Settings and the Topic
Definitions required for using Wonderware’s Server for Modicon Modbus. Use the following
steps to assist in choosing the right settings for connecting to your Equustek DL product.
1. Open Wonderware’s Server for Modicon Modbus. From the top menu bar, select Configure and then choose Com Port Settings. The Communication Port Settings window should appear as shown below.
1. Open Wonderware’s Server for Modicon Modbus. From the top menu bar, select Configure and then choose Com Port Settings. The Communication Port Settings window should appear as shown below.
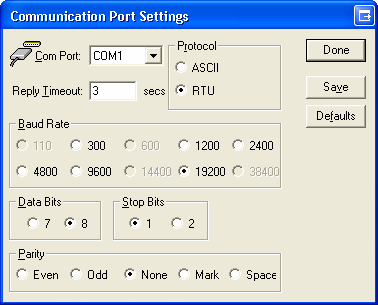
2. Choose the settings that you want to use to communicate with your DL product. It is
important that the settings chosen match the settings that have been configured into your DL
product using the DL32 configuration software. Choose the COM port that your DL product is attached to. If your unit is a DL4500, choose the virtual COM port that was set up using
the ComPort Redirector. For more information about the ComPort Redirector, please refer
to the DL4500 user manual.
3. After the COM port settings are chosen, click Save and then Done. Once this is done, the Communication Port Settings window should close and the main window should be active again.
4. From the top menu bar, select Configure and then choose Topic Definition. The Topic Definition window should now appear as shown below.

5. Click New to create a new topic. The Topic Definition window should appear as shown
below.
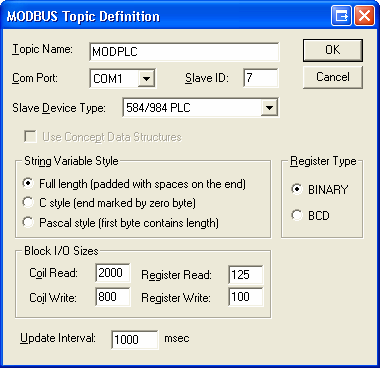
6. Enter the Topic Name (for example, MODPLC) for the topic you want to create and choose
the appropriate COM port. The Slave ID is the node address of the PLC on the DH+ network
that you want to communicate with. When finished, click OK to close the window. The Topic that was just created should now appear in the list on the left side of the Topic
Definition window.
7. Click Done to close the window. Wonderware’s Server for Modicon Modbus is now configured. Continue to section 2.2 for help on configuring the Wonderware Client Software WWClient.
7. Click Done to close the window. Wonderware’s Server for Modicon Modbus is now configured. Continue to section 2.2 for help on configuring the Wonderware Client Software WWClient.
2.2 Setting up the Wonderware Client software
This section is to help setup the Wonder Client Software WWClient to communicate with Wonderware’s Server for Modicon Modbus. Open the WWClient before following the steps below.
1.
When the WWClient opens, the Wonderware Logger program opens as well. Minimize the
Wonderware Logger, and click on the WWClient window to make it active.
2.
From the top menu bar, click on Connect. The Connect window should appear as shown
below.
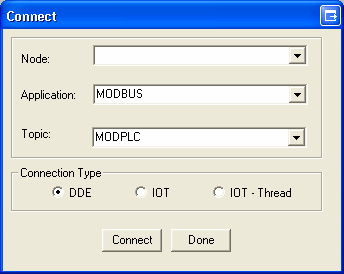
3.
On the Connect window, enter the following data. For the Node, make sure there is no value
in the box, for the Application, enter MODBUS, for the Topic, enter the topic that was
created in Wonderware’s Server for Modicon Modbus (for example, MODPLC), and for the
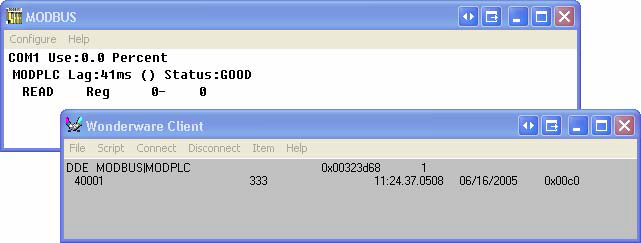
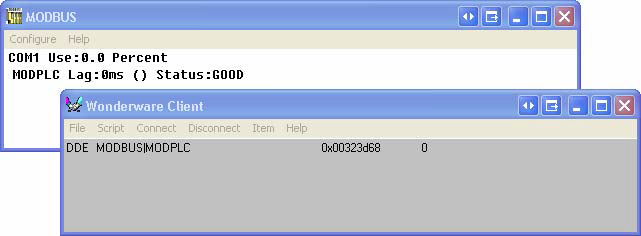
Connection Type, select DDE. After these settings are entered, click Connect. You should
see the following in Wonderware’s Modbus Server window and the WWClient window if
you have connected successfully.
4.
To add an item, select Item from the top menu bar. The following window should appear.
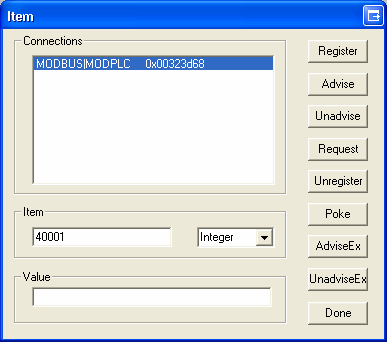
5.
In the Item section, choose the item that you would like to add (for example, 40001) and its
type (integer, discrete, etc.).
6.
To add the item, click Register and then click Advise. The following should then appear in
Wonderware’s Modbus Server window and the WWClient window.