Wonderware
Application Note
PDF Download
Wonderware’s WWRSLinx I/O Server
This application note is designed to help configure Wonderware’s WWRSLinx I/O Server for use with Equustek’s DL products. Wonderware’s WWRSLinx I/O Server is designed to work with Allan- Bradley’s RSLinx software. In order to use WWRSLinx with Allan-Bradley’s RSLinx, the version of Allan-Bradley’s RSLinx must have OPC and DDE connectivity. RSLinx LITE does not have OPC and DDE connectivity and will not work with WWRSLinx.
1. Configuring Allan-Bradley’s RSLinx Software
Before using Wonderware’s WWRSLinx software, Allan-Bradley’s RSLinx software must be configured. The following sections are to help configure the communications driver, client application, and the DDE/OPC topic configuration.
1.1 The Communications Driver
The following steps are to help configure the communications driver needed to allow RSLinx to communicate with your DL product. Start up your RSLinx software before beginning the following steps.
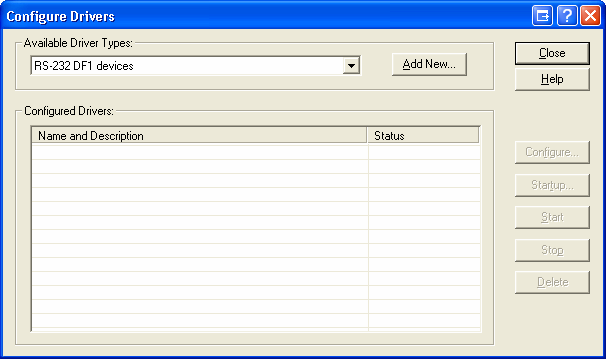
1. From the top menu bar, select Communications and then choose Configure Drivers. The
Configure Drivers window should appear as shown below.
2.
For the driver type, select RS-232 DF1 devices and then click Add New. A box should
appear asking for the name you want to give to the driver. Type the name you want to give
to your driver and click OK. The Configure RS-232 DF1 Devices window should appear as
shown below.
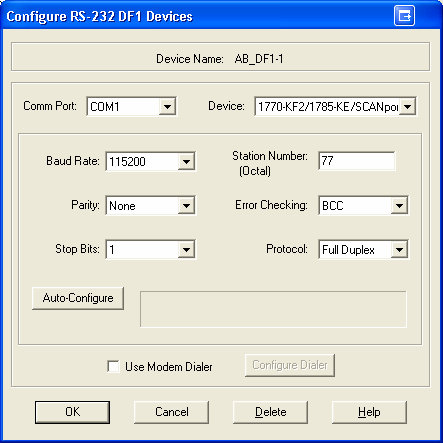
3.
In the Configure RS-232 DF1 Devices window, select the settings that you have configured
your DL product to communicate with. If using a DL4500 product, refer to the DL4500
Hardware Quick Start for setting up a virtual COM port using the ComPort Redirector.
Once all the settings are chosen, click OK. You should now see in the RSWho window the
communication driver that was just set up. Put a checkmark beside Autobrowse at the top
left corner of the window and all the nodes on your network should appear.
1.2 Client Application Configuration
This section deals with setting up the client applications so that Wonderware’s WWRSLinx can communicate with Allan-Bradley’s RSLinx software.
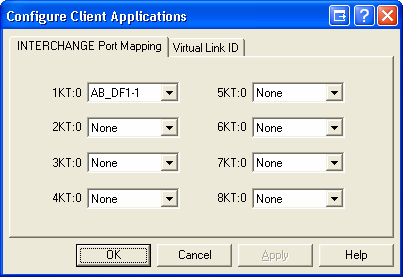
1.
From the top menu bar, select Communications and then choose Configure Client
Applications. The Configure Client Applications window should appear as shown below.
2.
Under the INTERCHANGE Port Mapping tab, select the communications driver that was
created in section 1.1. Once this has been selected, click the OK button.
1.3 The DDE/OPC Topic setup
The following steps are to help set up the DDE/OPC Topic configuration for the use with Wonderware’s WWRSLinx.
1.
From the top menu bar, select DDE/OPC and then choose Topic Configuration. The
DDE/OPC Topic Configuration window should appear as shown below.

2.
To add a new topic click the New button and enter the name of the topic (for example,
ABPLC). With the new topic selected, click the Data Collection tab. You should see the
following options.
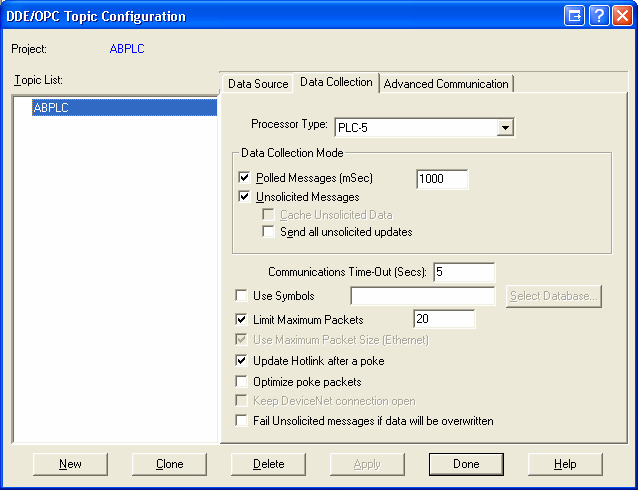
3.
For the Processor Type, select the type of processor you want to connect to. After you have
chosen the type of processor you want to connect to, make sure the following boxes are
checked: Polled Messages, Unsolicited Messages, Limit Maximum Packets, and Update
Hotlink after a poke. After all these settings are chosen, click Apply.
4.
After the Data Collection has been setup, select the Advanced Communication tab. You
should see the following options.
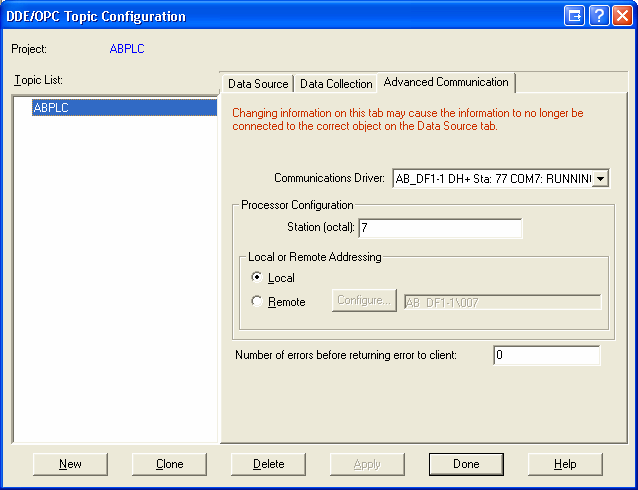
5.
For the Communications Driver, select the communication driver that was created in
section 1.1. Under Processor Configuration, select the station node address of the device
(PLC, SLC, etc.) that you want to connect to. After these settings are chosen, click Apply
and then click Done.
2. Configuring Wonderware’s WWRSLinx Software
After Allan-Bradley’s RSLinx has been configured, the next step is to configure Wonderware’s software. The following sections are to help in configuring WWRSLinx.
2.1 Setting up WWRSLinx
This section is to help in configuring WWRSLinx to be used with Allan-Bradley’s RSLinx software. Start your WWRSLinx software before continuing with the following steps.
1. From the top menu bar, select Configure and then choose Topic Definition. The Topic
Configuration window should appear as shown below.
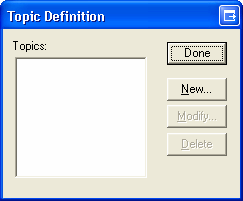
2.
To create a topic, click the New button. The WWRSLINX – Topic Definition window
should appear as shown below.
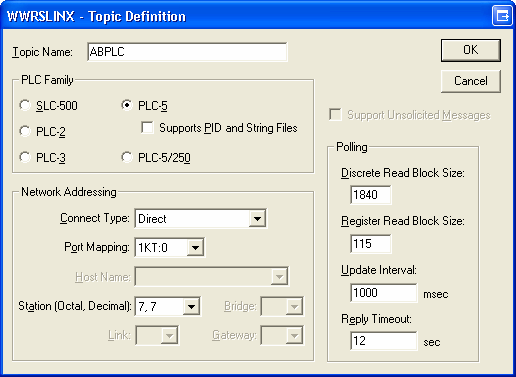
3.
Once this window appears, fill in the following information. For the Topic Name, use the
same name for the topic that was created in Allan-Bradley’s RSLinx. Under the PLC
Family, select the type of device you are connecting to. For the Networking Addressing,
select Direct for the Connect Type, 1KT:0 for Port Mapping, and the station node address of
the PLC for the station. After these settings are finished, click OK.
4.
The Topic Definition window from step 1 will reappear with the new topic that was just
created. Click the Done button to close this window. WWRSLinx is now setup.
2.2 Setting up the WWClient software
This section is to help setup the WWClient to communicate with WWRSLinx. Open the WWClient before following the steps below.
1. When the WWClient opens, the Wonderware Logger program opens as well. Minimize the
Wonderware Logger, and click on the WWClient window to make it active.
2.
From the top menu bar, click on Connect. The Connect window should appear as shown
below.
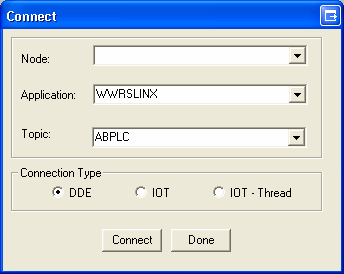
3.
On the Connect window, enter the following data. For the Node, make sure there is no value
in the box, for the Application, enter WWRSLINX, for the Topic, enter the topic that was
created in RSLinx, and for the Connection Type, select DDE. After these settings are
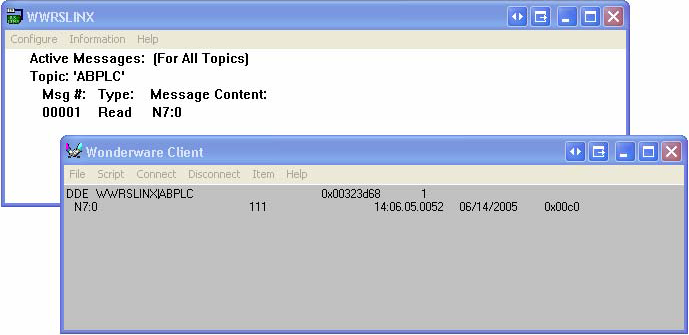
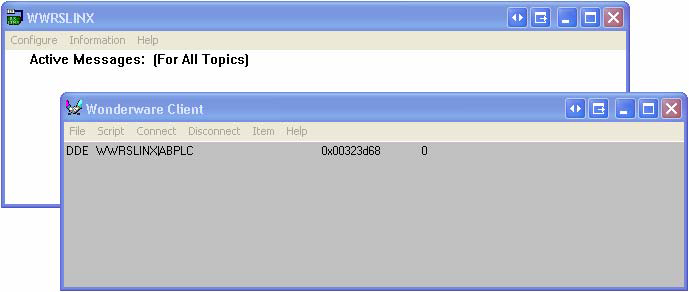
entered, click Connect. You should see the following in the WWRSLinx and WWClient
windows if you have connected successfully.
4. To add an item, select Item from the top menu bar. The following window should appear.
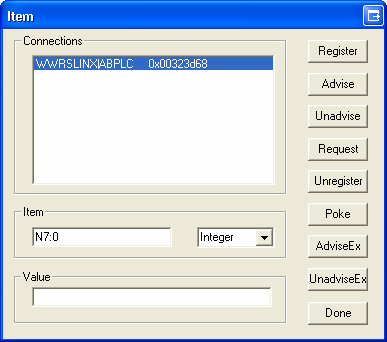
5. In the Item section, choose the item that you would like to add (for example, N7:0) and its
type (integer, discrete, etc.).
6. To add the item, click Register and then click Advise. The following should then appear in
the WWRSLinx window and the WWClient window.