Quickstart Procedure
DLPCI (PCI Bus DH+/DH-485 Interface Cards)
Using DL32 for Windows 95/98/NT/2000/XP
PDF Download
Please ensure that you have the Equustek Configuration CD available when installing the DLPCI card.
Please see the DLPCI user’s manual or spec sheet for cable diagrams and more in depth greater descriptions.
Please see the DLPCI user’s manual or spec sheet for cable diagrams and more in depth greater descriptions.
Step 1 – Install DLPCI in your PC
1. With the Power Off, insert the DLPCI card in an available slot of your PCI bus.
2. Replace cover and power up you PC, the DLPCI LED’s should go through the following startup sequence:
ERROR LED on for ˝ second, then NETWORK LED on for ˝ second, then BUS LED on for ˝ second.
2. Replace cover and power up you PC, the DLPCI LED’s should go through the following startup sequence:
ERROR LED on for ˝ second, then NETWORK LED on for ˝ second, then BUS LED on for ˝ second.
Step 2 – Installing the Driver on Power UP
1. If you are using a Non Plug Play O/S such as Windows NT then you will manually have to install the driver for the DLPCI. Please refer to the Windows NT installation guide.
2. Add New Hardware wizard should automatically detect the DLPCI card and start-up.
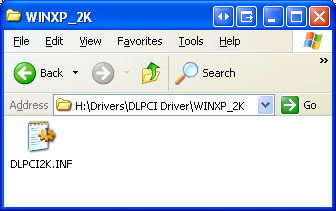
3. Select Have Disk when it is looking for the INF (Driver) file. Browse the Equustek CD and locate the appropriate file. In this example the Windows 2000 or XP one is selected.
Step 3 – Install and Run the DL32 Configuration Software

1. Insert the Equustek CD. The selection screen (left) should start up automatically. If it does not start automatically, select Run from the Start Menu and enter “D:\Autorun.exe” where “D” is the drive letter of your CD drive.
2. From the selection screen, choose Install Software ? Install DL32 Configuration Software ? Install Latest DL32 Software to install the latest version of DL32.
3. To run the DL32 software, Press the Start Button (bottom left of screen) then select Programs ? Equustek Solutions Inc. ? DL32.
Step 4 – Configuration Settings
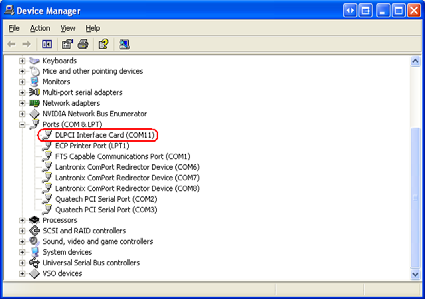
1. Before Starting the DL32 Configuration Software, find out what COM port has been assigned to the DLPCI. To do this, open the Device Manager (from the Control Panel, select System, then on the Hardware tab in the System Properties window, select Device Manager). Under Ports (COM & LPT) you will see the COM port assigned to the DLPCI.

2. From the DL32 Welcome Screen, click on the DL-PCI button.
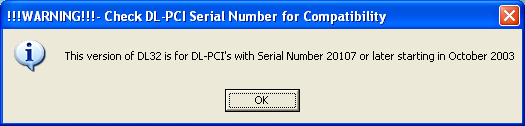
3. Ensure the SERIAL NUMBER of your DLPCI is greater than 20107, if not then you need to use the older DL32 Version 2.03.
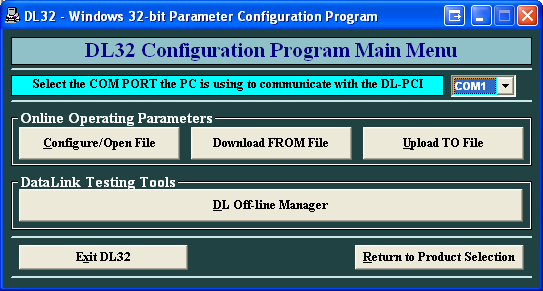
4. From the DL32 Main Menu, select the COM Port that has been assigned to the DLPCI and then click the Configure/Open File button.
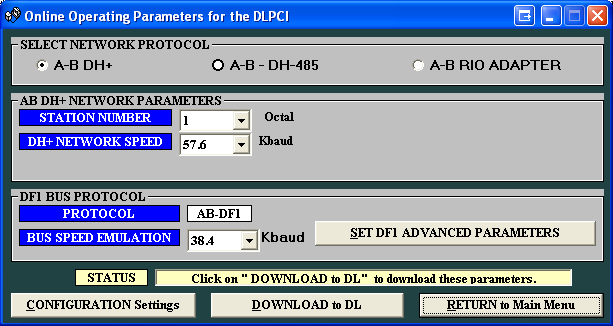
5. From the Configuration Menu:
a. Select the Network Protocol (based on the model of
DLPCI you have ordered).
b. Select the network parameters you want to assign to the card.
c. Select the DF1 Bus Protocol parameters. We recommend using 38.4 KBaud as the minimum emulation speed.
d. Under the DF1 Advanced Parameters, select the error checking method and other DF1 protocol settings. Typical users will want to leave the settings at their default values.
6. After all of the parameters are chosen, press the DOWNLOAD to DL button to send the parameters to the DLPCI. An “A-OK Parameters Transferred Successfully” will appear if the parameters were successfully downloaded. The DLPCI will automatically reset after transferring the configuration and go online.
7. If you wish to save the configuration settings, press the Configuration Settings button and select Save Configuration Settings.
8. Select Return to Main Menu and the select Exit DL32 to exit the program. The DLPCI is now ready for online operation.