Application Note
Accessing Data from DH+ Devices Using AB Ethernet and
Ethernet/IP Enabled Allen-Bradley Processors
PDF Download
Contents
OVERVIEW
3
CONFIGURING ETHERNET/IPMESSAGES
3
Legacy Devices (PLC-5, SLC 5/05)
3
CIP Devices (ControlLogix, CompactLogix)
3
OVERVIEW
4
CONFIGURING AB ETHERNET MESSAGES
4
BROWSING THE DH+ NETWORK
5
Communicating via Ethernet/IP
Overview
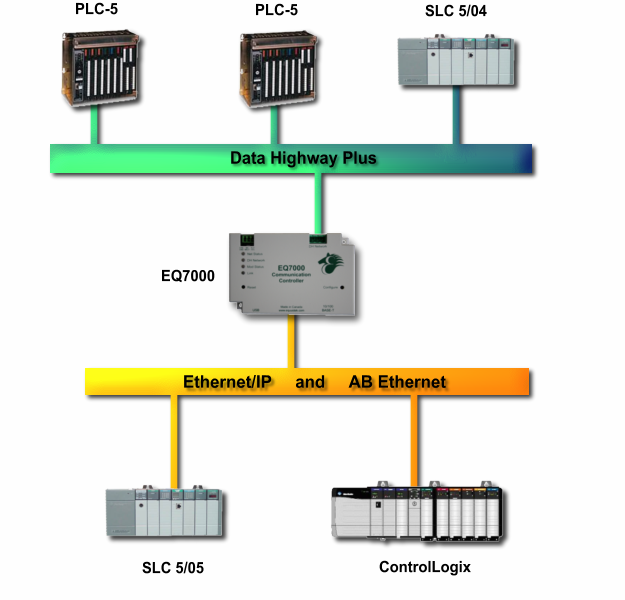
The EQ7000 is capable of bridging Ethernet/IP messages from Allen-Bradley processors to DH+ using either Unconnected Messages or Connected Class 3 Messages. The following is an explanation of how to setup either unconnected messages or connected messages to access data from a DH+ network depending on the type of Allen-Bradley Ethernet/IP enabled processor that you are using. The EQ7000 can not be used to browse a DH+ network using Ethernet/IP.
Configuring Ethernet/IP Messages
The following section describes how to setup Ethernet/IP messages using legacy devices and newer CIP devices.
Legacy Devices (PLC-5, SLC 5/05)
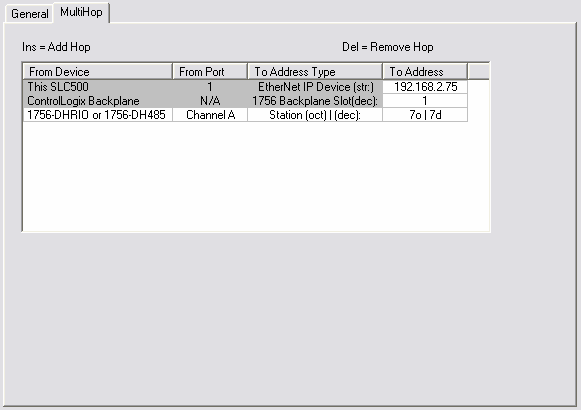
To communicate to nodes on the DH+ network using Ethernet/IP with legacy devices such as PLC-5 and SLC 5/05 processors requires the use of MultiHop messaging. Below is an example of how to setup the MultiHop message to access node 7 on the DH+ network.
The example above sends a message to an EQ7000 with an IP address of 192.168.2.75 which is then routed to node 7 on the DH+ network. As can be seen, the message is setup like it is communicating to a ControlLogix Bridge. When communicating to the EQ7000 use a Backplane slot number of 1.
CIP Devices (ControlLogix, CompactLogix)
When using a ControlLogix or similar device, there are two ways to configure the message to access data from the DH+ network. One way is to use unconnected messages and the other is to use connected messages.
The two examples below show how to setup a message to acquire data from node 7 on the DH+ through an EQ7000 with an IP address of 192.168.2.75.
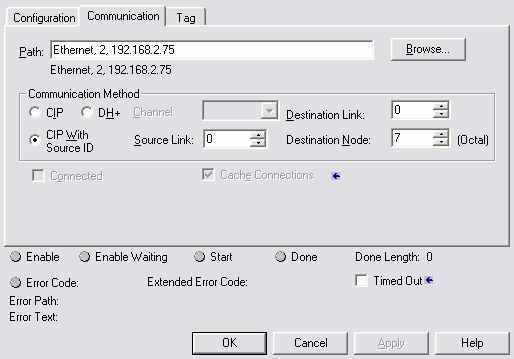
Unconnected Message
To send an unconnected message to the EQ7000 setup the Communication tab as shown below. For the Path setup, direct messages out the Ethernet module to the IP address of the EQ7000. For the Communication Method setup, select the CIP With Source ID option and set the Destination Node to the node of the device on the DH+ network that you want to communicate with.
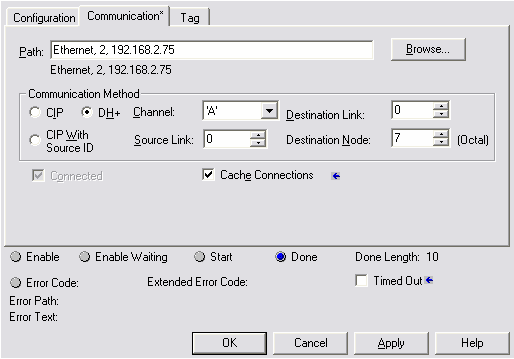
Connected Message
To send a connected message to the EQ7000 setup the Communication tab as shown below. For the Path setup, direct messages out the Ethernet module to the IP address of the EQ7000. For the Communication Method setup, select the DH+ option and set the Destination Node to the node of the device on the DH+ network that you want to communicate with. Ensure that the Cache Connections is checked.
The two examples below show how to setup a message to acquire data from node 7 on the DH+ through an EQ7000 with an IP address of 192.168.2.75.
Unconnected Message
To send an unconnected message to the EQ7000 setup the Communication tab as shown below. For the Path setup, direct messages out the Ethernet module to the IP address of the EQ7000. For the Communication Method setup, select the CIP With Source ID option and set the Destination Node to the node of the device on the DH+ network that you want to communicate with.
Connected Message
To send a connected message to the EQ7000 setup the Communication tab as shown below. For the Path setup, direct messages out the Ethernet module to the IP address of the EQ7000. For the Communication Method setup, select the DH+ option and set the Destination Node to the node of the device on the DH+ network that you want to communicate with. Ensure that the Cache Connections is checked.
Communicating via AB Ethernet
Overview
The EQ7000 is capable of bridging AB Ethernet messages from Allen-Bradley processors to DH+. The following is an explanation of how to setup AB Ethernet messages to access data from a DH+ network.
Configuring AB Ethernet Messages
To communicate to nodes on the DH+ network using AB Ethernet, remote messaging must be used. Using local messaging will only allow communication to a single device located at node 0 on the DH+.
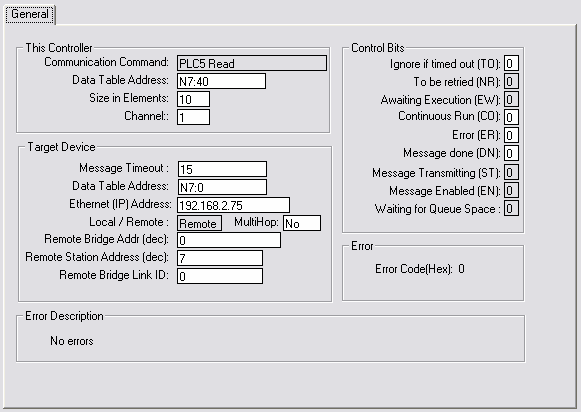
When using remote messaging, the source and destination link ID’s are not needed and can be left as 0. The destination address (or remote address) will be the value of the DH+ node address. Please note that DH+ uses octal notation and the application that is being used to setup the message may use decimal notation.
Below is an example of how to setup a remote message in a SLC 5/05 to read data from node 7 on the DH+ network through the EQ7000 at 192.168.2.75.
Browsing the DH+ Network
It is possible to browse known nodes on the DH+ network with the EQ7000 using the AB Ethernet driver in RSLinx. To do this, follow the steps below.
1 . Open the Configure Drivers window and create a new Ethernet Devices driver.
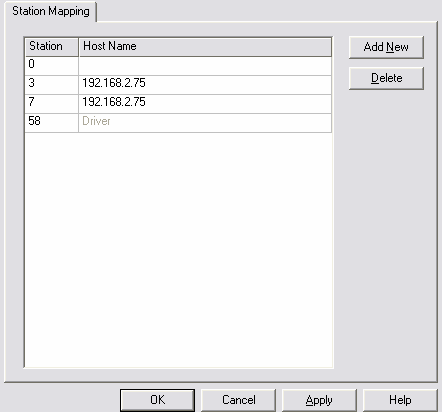
2 . After creating the new driver, the configuration window for station mapping should appear. Enter the node address of the DH+ device in Station column and the IP address of the EQ7000 in the Host Name column. Repeat this step if there are multiple nodes to be browsed.
3 . Once all the nodes are entered, enter the DH+ node address of the EQ7000 in the Station column where the Host Name is Driver. Below is an example showing DH+ nodes 3 and 7 being mapped to an EQ7000 with an IP address of 192.168.2.75 and DH+ node address of 58 decimal (72 octal).
4 . Once the driver is configured click OK to continue. Now that the driver is created, right click on the driver in the RSWho window and select Properties.
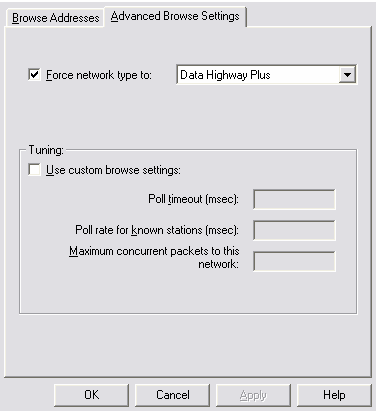
5 . In the Properties window, click the Advanced Browse Settings tab. Check the Force network type to option and select Data Highway Plus. Below is an example of how the properties will be set. Click OK to close the window.
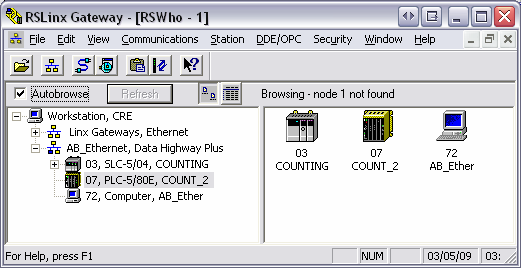
6 . Now the driver is setup to browse the nodes specified in the driver configuration, highlight the driver that was just created and make sure Autobrowse is checked. The nodes should now appear as shown below.
1 . Open the Configure Drivers window and create a new Ethernet Devices driver.
2 . After creating the new driver, the configuration window for station mapping should appear. Enter the node address of the DH+ device in Station column and the IP address of the EQ7000 in the Host Name column. Repeat this step if there are multiple nodes to be browsed.
3 . Once all the nodes are entered, enter the DH+ node address of the EQ7000 in the Station column where the Host Name is Driver. Below is an example showing DH+ nodes 3 and 7 being mapped to an EQ7000 with an IP address of 192.168.2.75 and DH+ node address of 58 decimal (72 octal).
4 . Once the driver is configured click OK to continue. Now that the driver is created, right click on the driver in the RSWho window and select Properties.
5 . In the Properties window, click the Advanced Browse Settings tab. Check the Force network type to option and select Data Highway Plus. Below is an example of how the properties will be set. Click OK to close the window.
6 . Now the driver is setup to browse the nodes specified in the driver configuration, highlight the driver that was just created and make sure Autobrowse is checked. The nodes should now appear as shown below.